Tuesday, March 5, 2013

Tending Fruit: An Urban Fruit Tree Growing Guide Now Available!!

Hello Folks, I am excited to finally offer after a year in the making, Tending Fruit: An Urban Fruit Tree Growing Guide written by yours truly. 

Tending Fruit
An Urban Fruit Tree Growing Guide


 (Sample of Cover Page)


Tending Fruit is geared towards those new to fruit tree growing and live in the Pacific Northwest, but it has basic principles that apply to fruit tree management in any area as well as offering a few surprises!  Now you can have your own copy in two easy ways:  1. An online version or 2. Hard copy.  I know books are slowly going out of fashion, so I can offer to send you a copy via email.  Here's how it will work:

Simply select the form of Tending Fruit you would like to buy above the 'Buy Now' button at right and follow the prompts to pay,  Make sure to include your email address if you are getting a PDF version and your home address if getting a hard copy!  Please allow 1-3 business days for delivery of PDF copies and 7 business days for hard copies.

The book has plenty of pictures, lots of line drawings of tree forms, and covers everything from tree selection to fruit thinning to pest and disease management.  I am excited to offer this work and to hear comments and feedback.  After all, fruit tree growing is a learning process.


Wednesday, February 13, 2013

It has been some time since my last blog.... no real excuses except time just keeps moving on.  Now is the time of year (Jan.-March in Portland) to plant your new tree!  I prefer buying bear root trees from the nursery as they tend to be more vigorous after planting.  Below is a step by step pictorial guide to planting your bear root tree.  Happy February.


Tree Planting Guide
 
Have the area in which you plant to plant your tree free of grass and/or mulched the year before you plant


Bare root Tree from Nursery – Buy your tree or have it shipped to you in the winter

With the fruit tree centered in the area of planting, measure the size of the planting hole, generally 2x as wide as the area of the roots


Using a digging fork, excavate the area for the tree hole putting the dirt removed to the sides of the hole


Place the tree in the excavated hole so that the roots spread out naturally to all sides and the graft union is 2-3” above the soil line


Refill the hole with the soil removed, tamping it lightly as you go and keeping the tree as vertical and straight as possible.  Fertilize the planted tree with about a cup of pelleted fertilizer spread evenly around the planting area


Mulch the entire 12’-12’ grass free area about 6-8” deep


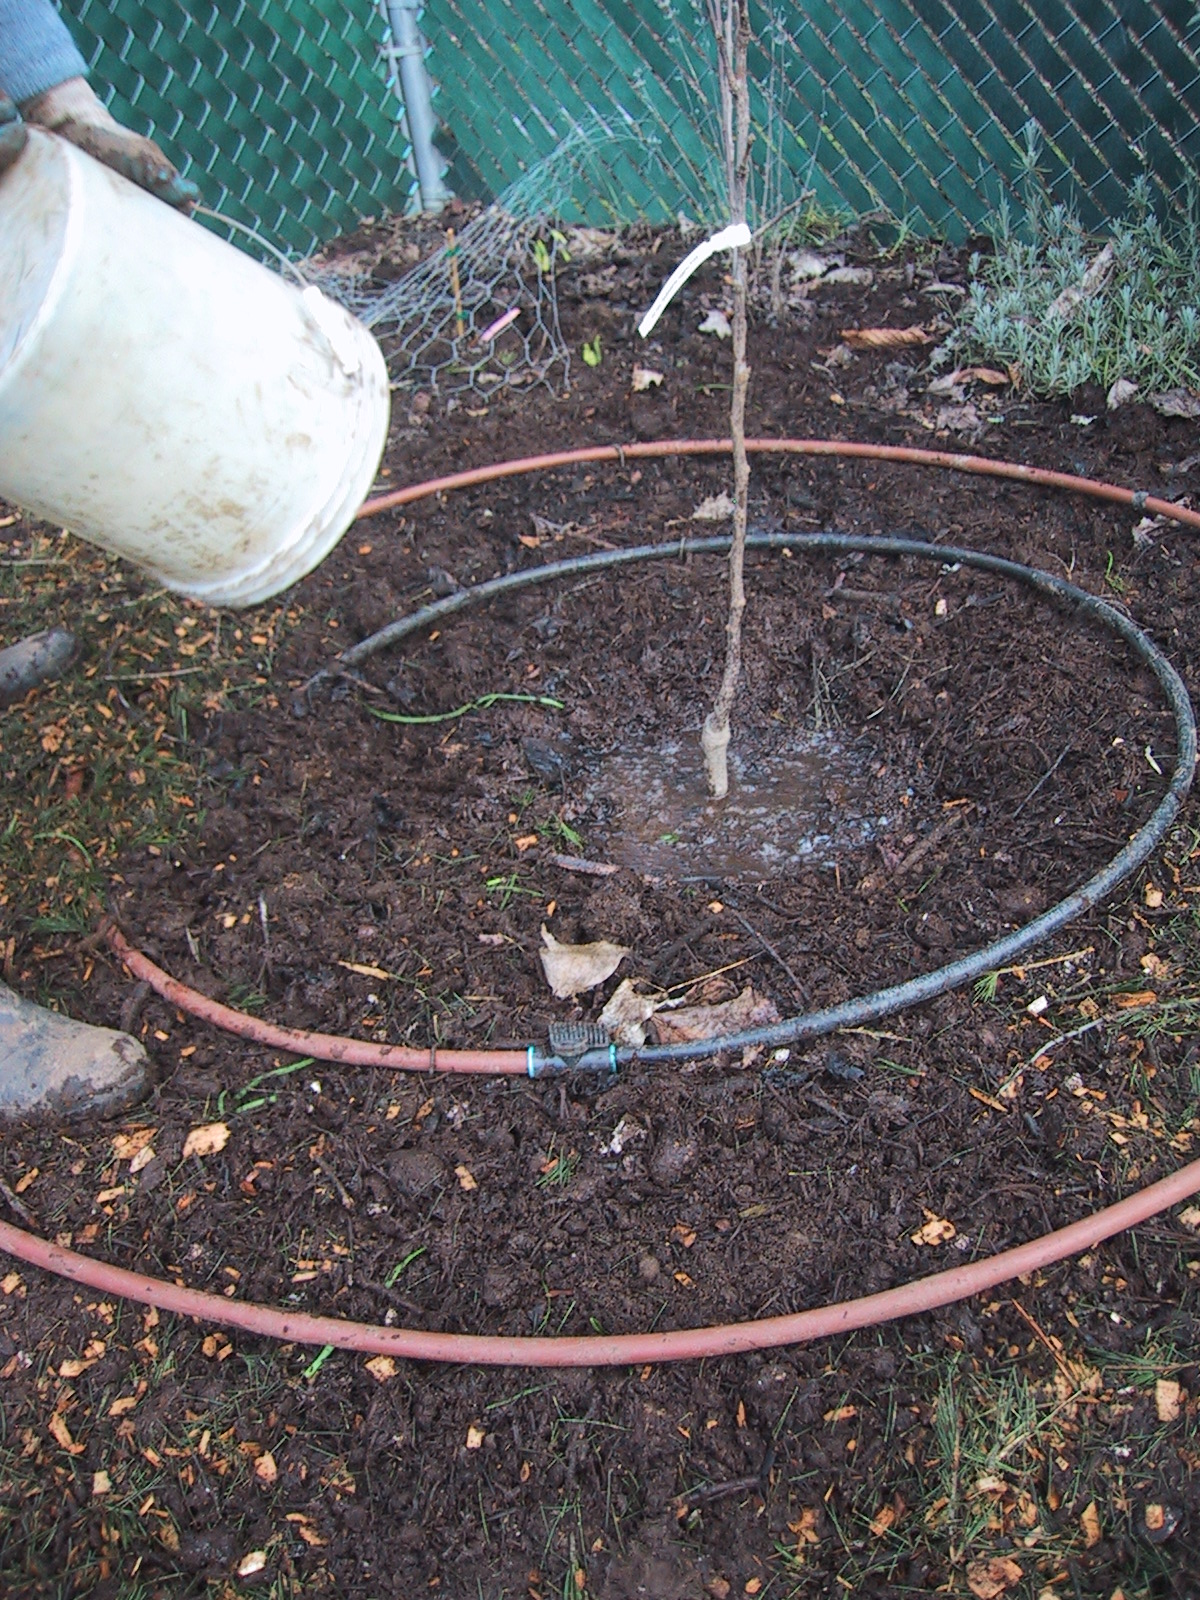
Water the tree lightly over the entire planting area until there is standing water


Perform the Initial Pruning Cut of the tree to about 2-2.5’ above the ground


Exceptions to the Rule #1 and #2:


1.    Do not perform initial pruning cut to stone fruits as they are very susceptible to bacterial canker in the winter in the Pacific North West.  Stone fruits are generally precocious and should grow well without the initial pruning.
2.    Do not perform initial pruning cut to a tree grafted with multiple varieties as you could most likely prune out all your grafts!!

Sunday, December 11, 2011

Fruit Badger Youngling Sited


Our first siting of a youngling fruit badger! Ahhh such a cutey learning the ways of fruit! Thanks for your picture Cheryl and Lenny.


Thursday, October 20, 2011

Now Taking Your Pictures of Fruit Badger Sitings!

Send in your photos of sitings of the elusive fruit badger! Add to the much needed knowledge of this secretive animal! Send them to j_iott@hotmail.com. Thanks!

Sunday, September 11, 2011

Late Summer Update

Well how the heck did it get to be September already? Again this summer in Portland, we had a cool wet early summer, with rain and cool temps (nights in the low 50's) up until July, and even July was mild. Only now in the beginnings of September, are we having 'warmer than average' temps with highs in the 90's. Ah, can't really win with Climate Change, but I guess be satisfied with what you get. We certainly are lucky to have plenty of water, unlike much of the rest of the country.

So, below are the latest and greatest of our now two year old baby orchard. Overall I am very happy with its progress, and have two trees which I call challenged, which required heading back again this winter, in order to achieve the first flush of growth that would give us our structural branches. One is our Akane, a relatively new variety that only produced a single, long water sprout last year. The other was our Klapp's Favorite Pear, which did the same thing, bearing only moderate, lop-sided new growth. I am happy to report that both are doing fine and have produced abundant new choices of growth after a second heading cut this winter past.

I was able to expand the diameter of the irrigation tubing around each of the trees by adding an additional 10' to each tree. The picture below gives an idea of what I am talking about.


As you can see, I have tried to get water to as much of the root zone as possible. This size ring with probably be good for the next 3-4 years, at which time I may add another 10-20 feet. These emitter tubing type irrigation lines have emitters spaced evenly within the tubing, so they don't clog or pop off, and are can be spaced 8", 10", 12", and 18" apart. The ones I use are 18" apart. At the moment, I am running sets of irrigation every two weeks for 5-6 hours. The emitters release 1 gallon per hour, so I am putting approximately 5-6 gallons of water per square foot every two weeks over an area of about 100 sq. ft. I have discovered a great website, http://weather.wsu.edu/, where I can track the daily evapotransperation rates for our area here in the Pacific Northwest. Using this information, I can calculate out how many gallons of water the trees need daily, which easily can be extrapolated out to a week.... but I digress. Robert Kourick has a great book all about garden irrigation, where he outlines how to do this math, and he does it well.

Below is a picture of our Hudson's Golden gem in its full glory. Note the almost 4' of extension growth this season! What a marvelous example of an open center tree form.


Below is our Korean Giant Asian Pear which chose to take on a beautiful central leader form. I am quite happy with this tree, and have only had to do minimal training so far. Though it is already 9' tall after its second season! Yikes, good thing it is in the back of the garden!


Finally here is an image of one of the trees that I headed back a second time this winter to inspire better initial growth. I believe it is our Klapp's Favorite, but as you can see, it is making a best second effort.


The only sad news, that is both baffling to me and a bit frustrating is our Green Gage Plum. At this moment, it is near leafless, and has put on no new extension growth this season, despite a great showing in the spring. I believe it is Verticillium Wilt, but have not confirmed this, and a sample twig did not show the characteristic black streaking in the cambium/phloem layer. I am hoping with a bit of compost, and a more judicious spray program next season, it will fully recover.

The next goals for the orchard this fall, is to compost each tree, and re chip the entire area. That will see them through until the spring.

Until next time, whenever that is.

Monday, January 31, 2011

First Pruning of Fruit Trees

Hello folks, been some time since my last entry, just about a year. It's amazing how summer will suck the time away. I have moved from my last position with Portland Community Gardens, and now work with One Green World Nursery (www.onegreenworld.com) tending their specimen plants. It will be an incredible learning experience and setting for fruit culture.

We just finished pruning our fruit trees for this season, their first winter pruning, and I wanted to share some pictures of the finished product. The first season is instrumental in choosing the form your tree will have during its lifetime. I usually choose between open center/vase shaped tree or the central leader/Christmas tree shape. Both try to maximize sunlight to all parts of the tree and if you cannot figure out the shape for your tree, most times your tree will choose for you. There are some who say you have to have a certain shape for certain kinds of trees, but I think it is easier to work with the natural shape of the tree.

Below is a picture of an open center tree form. This is our Hudson's Golden Gem, an Oregon born tree, and note the spreading of the branches by use of stakes and string. This will insure proper branch angle to open the center of the tree, and can be removed later in the season. We also headed back each of the branches about 4-6 inches to a downward facing but to ensure the continued progression of the tree outward.


The next image is for a central leader tree. This is one of our Asian pears, which will have vigorous upright laterals, and strong branches. Note how large the tree is already after only one season. Again we used string and stakes to reinforce form and branch angle, and note the clearly defined central leader.


Okay, the next steps will come in Feb./Mar when we will fertilize the trees for the second time with balanced 8-4-4 pelleted fertilizer. We are hoping for 2-3 feet of extension growth this season.

Until next time, be fruitful!

Sunday, January 31, 2010

February 1st Update

Howdo, and its been just about a month and a half since the last entry, I'll soon be heading back to work after a WONDERFUL two months off to fulfill my role as a seasonal employee for the city, and many hours of transformation to our budding garden. Here is the update and photos to kickoff groundhogs day. If there were any in the yard they are long gone, scared off by lots of digging. Yes, one morning, after I awoke early, I had the bright idea of putting in an underground irrigation system before I went back to work. Overly ambitious.... Yes! Lots of work..... Yes! Am I enjoying it.... you bet your a....s! I once asked a friend who bought a house if he thought it was worth it. His answer, "Best thing I ever did." Okay, I will agree at least that the freedom of doing projects is infinite, but so much fun. I think I have found my creative outlet.

So take a peak at the photos. All the fruit trees are in, with our final batch coming from Earth's Rising Nursery two days ago, just in time for a little rain right after they got into the ground... such happy trees. They are the sticks you see in the photos. Hopefully by July, they will be six feet tall and multi branched. The mulching is complete as is the wood chip mountain, and now the work of digging trenches for the irrigation system is 3/4 complete. After, or maybe before, depends on the weather, a kiwi trellis will be going in on the South side of the property, be about 6' tall so we can just walk underneath, and pick to our hearts content. Yummy.

G0t lots of work to do, so have a gander at these latest and greatest.


Below are the fruit trees newly planted and headed back to about 2.5 feet from the ground


The beginnings of the underground irrigation system (Garden Beds are staked out in background)


Below looking towards the SE corner (Bird Bath, compost pile, and future site of kiwi an trellis)